I CT FOR


I Am Protected

TWI Registered

UTR Registered

Network Blog
Follow Me To...
1/26/2012
 ♥New Tutorial: Cherish the ♥Love♥

SUPPLIES:
PSP- ANY VERSION: I am using PSP X2
TUBE OF CHOICE: I am using the gorgeous artwork of Keith Garvey. You MUST have a license to use his work. You can find & buy his work, as well as finding info on obtaining a license, at PSP Tubes Emporium...HERE
SCRAP KIT OF CHOICE: I am using a beautiful kit called "Cherish the Love" by Rieneke. You can find this kit & all her other kits at her blog, Rieneke Designs...HERE and you can purchase her kits at Twilight Scraps...HERE
MASK OF CHOICE: I am using MC_Mask6 by Melissa, mask set 1-20. You can download this set of masks at her blog, Melissaz Creationz...HERE
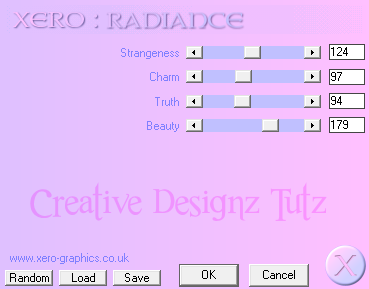
EFFECTS/PLUG-INS OF CHOICE: I used xero-->radiance. If you go to the link I will provide, you can either download the xero-classic set with multiple effects or you can download each effect individually. You will find these at Xero Graphics...HERE
If during any part of the tutorial you are not sure of something or where it goes,
please feel free to use my tag for reference if needed.
O.K., LET'S GET STARTED:
Open a new raster image, 700 X 700. I always do a transparent background, but that is up to you.
Open Element 111, a black double frame, copy & paste onto your new image, place as desired. I left it right where it pasted.
Open your tube and copy and paste it on top of the frame layer. Arrange to your liking.
Open Element 46, a branch of flowers, copy and paste on top of the frame but under your tube. As you can see on my tag, I placed one on top of the frame on the right hand side & one on the left hand bottom side. I erased parts of each that went behind the tube. I merged the 2 layers together.
Next I added the paper for the frame background. I used Paper 8, but use what you like. I resized this to 700 pixels. Copy and paste behind your frame. Click the frame layer to make active. Using your magic wand, hold down the shift button on your keyboard & click inside each frame. You will have 2 marching ants squares. This is what we want. Now go to selections-->modify-->expand & expand by 5.
Go to selections-->invert. Make sure your paper is the active layer now in your layers palette, if it isn't, click it in the palette & hit delete on your keyboard. Go to selections-->select none.
Now we are going to add the tubes into the frame. First thing I did was get the tube I wanted, which was a close-up of the tube I am using. Copy and paste the tube under the frame, but above the paper, arrange to your liking. When you have done that, duplicate the tube and mirror, arrange on other side to your liking. Now, make sure your frame layer is active. Using your magic wand, while holding down on the shift button of your keyboard and click inside each frame. Go to Selections-->Modify-->Expand & expand by 5. Now go to Selections-->Invert. Now on your layer palette on the side of your psp, make one of the tubes active & hit delete on your keyboard, do the same with the other side.
I added Xero-->Radiance to all tubes with the following settings...
I next added my mask. Open your paper of choice, I used Paper 2. I resized it to 700 pixels, copy & paste onto bottom layer of tag. Add your mask however you do it normally. If you do not now how, there are 2 ways, depending on what version you have. If you have your masks loaded through a folder in your psp files, then you will make sure your paper layer is active, go to Layers-->Load/Save Mask-->Load Mask From Disk, then choose your mask when they load, then select ok. You may have to invert.
If you do not have a folder through your psp files, then you need to open the mask in your psp. If you have to you can drag it from a folder into psp. Go to your tag, in the layers palette, right click on top of the paper layer for your mask. Go to New Mask Layer-->From Image Find your mask in the source window, usually a drop down menu style. Again, you may have to invert, select ok. Regardless if how you have to do it, to merge the layers: Make sure one of your mask layers is active, go to Layers-->Merge-->Merge Group.
This will make your mask layers 1 layer.
Now open Element 15, love word art with hearts, copy and paste on top of your mask layer. Move over towards the left side of the frame, duplicate and move over towards the right side. I merged the layers together after.
Open Element 97, this is red dots/lights, copy and paste as is on top of the word art layer, under the frame. I placed towards the left side. I then duplicated, mirrored then flipped.
Element 22, yellow lights shaped in a half circle. Copy and paste on top of frame layer.
Open Element 31, closed envelope, and resize 20%. Arrange on the bottom right side corner.
Open Element 7, light in the jar, resize 15% and arrange in the corner with envelope.
Now open Element 54, colored bird, resize 8% and arrange it so it looks as if it is sitting on the envelope.
Now open Element 34, red butterfly, and resize 8%. I pasted mine on top of the flowers in the top right corner and the other on the bottom left hand corner.
Element 35, this is a whitish/cloudyish layer of clocks. I resized it 80% and pasted it on top of the tube on the left hand side in the frame. So it needs to go under your frame layer, but above that tube. Arrange to your liking.
Last one, Element 85, keys on the string, resize 35%, copy and paste on top of frame and place in top left hand corner.
That is it. If you are satisfied with your tag, add your copyright info and name and save. Some people merge all there layers together, but this is up to you.
Thank you so much for trying out my tutorials!
♥HUGZ♥JESS♥
1/14/2012
♥I'm BACK!!♥
Hello to all my friends and/or followers. I just wanted to post this quick message letting everyone know that I am back. I have been offline for a while, so my blog has not had a new post for a little while. I have picked back up a few of my CT's again, so be on the lookout for some new tuts coming right up. Thanks to everyone who has not forgotten me & has kept in touch through email & instant messaging. I appreciate your comments, thoughts & well wishes. Hope to see you all around my blog again real soon.
♥HUGZ♥JESS♥
Subscribe to:
Posts (Atom)
My Blinkie


