I CT FOR


I Am Protected

TWI Registered

UTR Registered

Network Blog

Follow Me To...

3/05/2012
 ♥New Tag N Tut - I'm Not Broken♥

 2:11 PM |
  Posted by
Unknown |
Posted by
Unknown |


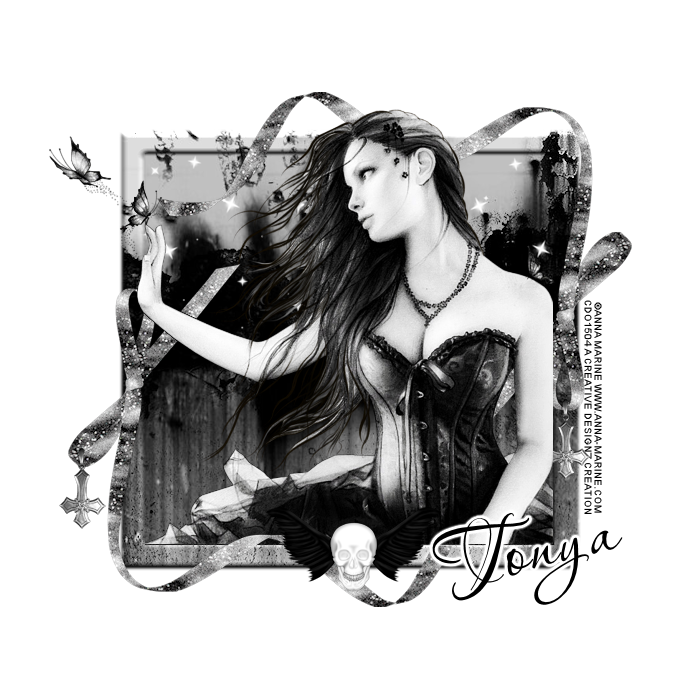
THIS TUTORIAL WAS WRITTEN FOR THOSE WITH A GENERAL WORKING KNOWLEDGE OF PSP
SUPPLIES:
TUBE OF CHOICE: I am using the beautiful artwork of Zindy S. D. Neilsen You must have a license to use this work. To purchase her tubes and/or obtain a license, visit her store here...Zindy Zone Shop
SCRAP KIT OF CHOICE: I am using a gorgeous kit called I'm Not Broken by Tonya. You can check out her site here...Broken Sky Dezine & you may purchase her kits at multiple stores. There are quite a few, so instead of posting them here, just check out her blog on the left hand side & you will find a list of stores.
EFFECTS OF CHOICE: I am using the effects Xero-->Radiance. If you do not have this, you can get it...HERE Go down to where it says Freeware Plug-Ins 2009, next to that it says download, with that you can download the entire program or you can go below & click on each individual effect you want. I suggest the full program, it has some great effects. I also used Eye Candy 4000-->Gradient Glow, which you can Google for free download if you don't have it.
FONT OF CHOICE: I am using a beautiful font called Aquarelle, if you do not have it you can get it here... FONTS101 & I used Ariel for the copyright. You should have that in your PSP already.
EFFECTS OF CHOICE: I am using the effects Xero-->Radiance. If you do not have this, you can get it...HERE Go down to where it says Freeware Plug-Ins 2009, next to that it says download, with that you can download the entire program or you can go below & click on each individual effect you want. I suggest the full program, it has some great effects. I also used Eye Candy 4000-->Gradient Glow, which you can Google for free download if you don't have it.
FONT OF CHOICE: I am using a beautiful font called Aquarelle, if you do not have it you can get it here... FONTS101 & I used Ariel for the copyright. You should have that in your PSP already.
OK, LET'S GET STARTED:
Open a new raster image, 700 X 700
Open BSD21, the square frame, & resize 80%, copy & paste onto new image.
Open Paper BSD5 & resize 80%. Copy & paste onto tag under frame layer. The paper should line up perfectly with the frame. Make sure your frame is the active layer & click inside with your magic wand. Go to image-->modify-->expand & expand by 5. Go to selections-->invert. Make sure your paper is the active layer in the layer palette, if not, click on it. Hit delete on your keyboard. Go to selections-->select none.
Open BSD51, stars, & paste on top of paper layer but under frame. I moved to the left side, right click on your mouse w3ith the pointer above the star layer i your layers palette & click duplicate. Go to image-->mirror.
Adjust if needed.
Open BSD56, the gray ribbon, & resize 80%. Copy & paste on top of frame layer. Position in left bottom corner. Duplicate, go to image-->mirror, then image-->flip. Position in top right hand corner. On the bottom ribbon I erased a part of the end of the ribbon to meet flush against the edge of the frame. See my tag for reference if needed. I did this because the bottom ribbon will be above the tube & the top will be under.
Open your tube of choice. I added a radiance effect.
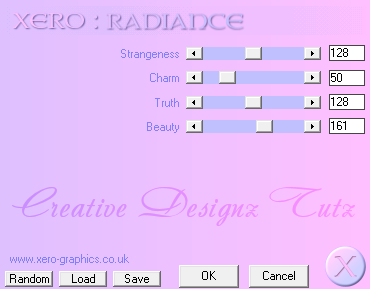
Go to effects-->plug-ins-->xero-->radiance & click ok after you add these settings...

Now, Copy & paste onto your tag. If you need to, click on your tube in the layers palette & drag it so it is above the top ribbon & below the bottom ribbon. You may need to move the ribbon layers around a bit to do this.
Open BSD60, the skull with wings, Resize 30%, Copy & paste onto tag on top layer & place in the bottom center of the frame. It should be above the tube & ribbon layers.
Now open the last element, BSD6 & Resize 20%. Copy & paste onto tag. I placed in the curve of one of the ribbons, duplicate & place on the other ribbon.
Add any other elements you like. I kept this simple I know, but I tried adding some of the colored elements to it, but just didn't like it. I like it better with the black & white look.
If you are happy with it, you can add your name & copyright info. Make sure this is legible & clear. You may add any drop shadow to any layers you like & merge layers together if that is something you do.
That is it. I hope you enjoyed my tutorial. Thanks so much for checking it out.
♥HuGz♥MsJess♥
Open BSD51, stars, & paste on top of paper layer but under frame. I moved to the left side, right click on your mouse w3ith the pointer above the star layer i your layers palette & click duplicate. Go to image-->mirror.
Adjust if needed.
Open BSD56, the gray ribbon, & resize 80%. Copy & paste on top of frame layer. Position in left bottom corner. Duplicate, go to image-->mirror, then image-->flip. Position in top right hand corner. On the bottom ribbon I erased a part of the end of the ribbon to meet flush against the edge of the frame. See my tag for reference if needed. I did this because the bottom ribbon will be above the tube & the top will be under.
Open your tube of choice. I added a radiance effect.
Go to effects-->plug-ins-->xero-->radiance & click ok after you add these settings...
Open BSD60, the skull with wings, Resize 30%, Copy & paste onto tag on top layer & place in the bottom center of the frame. It should be above the tube & ribbon layers.
Now open the last element, BSD6 & Resize 20%. Copy & paste onto tag. I placed in the curve of one of the ribbons, duplicate & place on the other ribbon.
Add any other elements you like. I kept this simple I know, but I tried adding some of the colored elements to it, but just didn't like it. I like it better with the black & white look.
If you are happy with it, you can add your name & copyright info. Make sure this is legible & clear. You may add any drop shadow to any layers you like & merge layers together if that is something you do.
That is it. I hope you enjoyed my tutorial. Thanks so much for checking it out.
♥HuGz♥MsJess♥
1/26/2012
♥New Tutorial: Cherish the ♥Love♥

SUPPLIES:
PSP- ANY VERSION: I am using PSP X2
TUBE OF CHOICE: I am using the gorgeous artwork of Keith Garvey. You MUST have a license to use his work. You can find & buy his work, as well as finding info on obtaining a license, at PSP Tubes Emporium...HERE
SCRAP KIT OF CHOICE: I am using a beautiful kit called "Cherish the Love" by Rieneke. You can find this kit & all her other kits at her blog, Rieneke Designs...HERE and you can purchase her kits at Twilight Scraps...HERE
MASK OF CHOICE: I am using MC_Mask6 by Melissa, mask set 1-20. You can download this set of masks at her blog, Melissaz Creationz...HERE
EFFECTS/PLUG-INS OF CHOICE: I used xero-->radiance. If you go to the link I will provide, you can either download the xero-classic set with multiple effects or you can download each effect individually. You will find these at Xero Graphics...HERE
If during any part of the tutorial you are not sure of something or where it goes,
please feel free to use my tag for reference if needed.
O.K., LET'S GET STARTED:
Open a new raster image, 700 X 700. I always do a transparent background, but that is up to you.
Open Element 111, a black double frame, copy & paste onto your new image, place as desired. I left it right where it pasted.
Open your tube and copy and paste it on top of the frame layer. Arrange to your liking.
Open Element 46, a branch of flowers, copy and paste on top of the frame but under your tube. As you can see on my tag, I placed one on top of the frame on the right hand side & one on the left hand bottom side. I erased parts of each that went behind the tube. I merged the 2 layers together.
Next I added the paper for the frame background. I used Paper 8, but use what you like. I resized this to 700 pixels. Copy and paste behind your frame. Click the frame layer to make active. Using your magic wand, hold down the shift button on your keyboard & click inside each frame. You will have 2 marching ants squares. This is what we want. Now go to selections-->modify-->expand & expand by 5.
Go to selections-->invert. Make sure your paper is the active layer now in your layers palette, if it isn't, click it in the palette & hit delete on your keyboard. Go to selections-->select none.
Now we are going to add the tubes into the frame. First thing I did was get the tube I wanted, which was a close-up of the tube I am using. Copy and paste the tube under the frame, but above the paper, arrange to your liking. When you have done that, duplicate the tube and mirror, arrange on other side to your liking. Now, make sure your frame layer is active. Using your magic wand, while holding down on the shift button of your keyboard and click inside each frame. Go to Selections-->Modify-->Expand & expand by 5. Now go to Selections-->Invert. Now on your layer palette on the side of your psp, make one of the tubes active & hit delete on your keyboard, do the same with the other side.
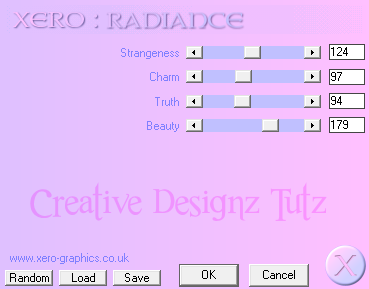
I added Xero-->Radiance to all tubes with the following settings...
Go to selections-->invert. Make sure your paper is the active layer now in your layers palette, if it isn't, click it in the palette & hit delete on your keyboard. Go to selections-->select none.
Now we are going to add the tubes into the frame. First thing I did was get the tube I wanted, which was a close-up of the tube I am using. Copy and paste the tube under the frame, but above the paper, arrange to your liking. When you have done that, duplicate the tube and mirror, arrange on other side to your liking. Now, make sure your frame layer is active. Using your magic wand, while holding down on the shift button of your keyboard and click inside each frame. Go to Selections-->Modify-->Expand & expand by 5. Now go to Selections-->Invert. Now on your layer palette on the side of your psp, make one of the tubes active & hit delete on your keyboard, do the same with the other side.
I added Xero-->Radiance to all tubes with the following settings...
I next added my mask. Open your paper of choice, I used Paper 2. I resized it to 700 pixels, copy & paste onto bottom layer of tag. Add your mask however you do it normally. If you do not now how, there are 2 ways, depending on what version you have. If you have your masks loaded through a folder in your psp files, then you will make sure your paper layer is active, go to Layers-->Load/Save Mask-->Load Mask From Disk, then choose your mask when they load, then select ok. You may have to invert.
If you do not have a folder through your psp files, then you need to open the mask in your psp. If you have to you can drag it from a folder into psp. Go to your tag, in the layers palette, right click on top of the paper layer for your mask. Go to New Mask Layer-->From Image Find your mask in the source window, usually a drop down menu style. Again, you may have to invert, select ok. Regardless if how you have to do it, to merge the layers: Make sure one of your mask layers is active, go to Layers-->Merge-->Merge Group.
This will make your mask layers 1 layer.
Now open Element 15, love word art with hearts, copy and paste on top of your mask layer. Move over towards the left side of the frame, duplicate and move over towards the right side. I merged the layers together after.
Open Element 97, this is red dots/lights, copy and paste as is on top of the word art layer, under the frame. I placed towards the left side. I then duplicated, mirrored then flipped.
Element 22, yellow lights shaped in a half circle. Copy and paste on top of frame layer.
Open Element 31, closed envelope, and resize 20%. Arrange on the bottom right side corner.
Open Element 7, light in the jar, resize 15% and arrange in the corner with envelope.
Now open Element 54, colored bird, resize 8% and arrange it so it looks as if it is sitting on the envelope.
Now open Element 34, red butterfly, and resize 8%. I pasted mine on top of the flowers in the top right corner and the other on the bottom left hand corner.
Element 35, this is a whitish/cloudyish layer of clocks. I resized it 80% and pasted it on top of the tube on the left hand side in the frame. So it needs to go under your frame layer, but above that tube. Arrange to your liking.
Last one, Element 85, keys on the string, resize 35%, copy and paste on top of frame and place in top left hand corner.
That is it. If you are satisfied with your tag, add your copyright info and name and save. Some people merge all there layers together, but this is up to you.
Thank you so much for trying out my tutorials!
♥HUGZ♥JESS♥
This will make your mask layers 1 layer.
Now open Element 15, love word art with hearts, copy and paste on top of your mask layer. Move over towards the left side of the frame, duplicate and move over towards the right side. I merged the layers together after.
Open Element 97, this is red dots/lights, copy and paste as is on top of the word art layer, under the frame. I placed towards the left side. I then duplicated, mirrored then flipped.
Element 22, yellow lights shaped in a half circle. Copy and paste on top of frame layer.
Open Element 31, closed envelope, and resize 20%. Arrange on the bottom right side corner.
Open Element 7, light in the jar, resize 15% and arrange in the corner with envelope.
Now open Element 54, colored bird, resize 8% and arrange it so it looks as if it is sitting on the envelope.
Now open Element 34, red butterfly, and resize 8%. I pasted mine on top of the flowers in the top right corner and the other on the bottom left hand corner.
Element 35, this is a whitish/cloudyish layer of clocks. I resized it 80% and pasted it on top of the tube on the left hand side in the frame. So it needs to go under your frame layer, but above that tube. Arrange to your liking.
Last one, Element 85, keys on the string, resize 35%, copy and paste on top of frame and place in top left hand corner.
That is it. If you are satisfied with your tag, add your copyright info and name and save. Some people merge all there layers together, but this is up to you.
Thank you so much for trying out my tutorials!
♥HUGZ♥JESS♥
1/14/2012
♥I'm BACK!!♥
Hello to all my friends and/or followers. I just wanted to post this quick message letting everyone know that I am back. I have been offline for a while, so my blog has not had a new post for a little while. I have picked back up a few of my CT's again, so be on the lookout for some new tuts coming right up. Thanks to everyone who has not forgotten me & has kept in touch through email & instant messaging. I appreciate your comments, thoughts & well wishes. Hope to see you all around my blog again real soon.
♥HUGZ♥JESS♥
8/01/2011
New Tut: Diamonds

Hello to you my dear friends., I hope everyone is having a wonderful day. I have a new tut up here, a CT tut for Vicki's site, Pink Princess Scraps using one of her beautiful kits. Hope you enjoy!!
THIS TUTORIAL WAS WRITTEN FOR THOSE WITH A GENERAL WOKRING KNOWLEDGE OF PSP.
SUPPLIES:
PSP-Any Version: I used PSP x2
Tube of Choice: I used the beautiful artwork of Keith Garvey. You must have a license to use his work. To purchase the tube &/or obtain a license, go...HERE.
Template: I am using a template made by Deb & Tamie, this is a collab challenge from Creative Misfits Forum. You can download their set...HERE. It is collab #3.
Ok, before we get started I just want to say that during anytime if you have any questions, please check my tag for references. If this doesn't help, please do not hesitate to email me & I will answer you as soon as possible & also change the tutorial if it is hard to understand in spots. I am still learning here, so any comments or concerns are welcomed please.
OK, LET'S GET STARTED:
Open up the temp, hit shift & d on your keyboard. Close out the original template. Delete the copyright info. I also delete the white background layer, but this is up to you.
Now we will add papers of choice to each layer. This is what I did...
Raster 1 & Copy of Raster 1, the 2 pink squares in front, I used pp5. Highlight one of the squares in your layers palette, using your magic wand click inside that square, copy & paste your paper on top of the square. Go to Selections-->Invert & hit delete on your keyboard. Go to Selections-->Select none. Repeat with the other square. Add 50% noise with uniform & monochrome checked to the white squares behind the pink squares.
Now we are going to make it so every layer has a white background to add noise to. This is how we are going to accomplish that...
Highlight Raster 6 in your layers palette, the large white square beneath the purple rectangle layer. Go to Selections-->Float, Selections-->Defloat, Selections-->Modify-->Contract & Contract by 6. Go to Layers-->New Raster layer. Place this blank layer above the white square if it is not already. Copy & paste your paper of choice into this blank layer. I used pp4. Go to selections-->invert & hit delete. Add the same noise to the white background layer as before.
Highlight Raster4, the black rectangle, in your layers palette. Go to Selections-->Float, Selections-->Defloat, Selections-->Modify-->Expand & expand by 1. Using your flood fill tool, flood it white. Go to Selections-->Contract & contract by 5. Go to Layers-->New Raster Layer & again, if it is not already above the white rectangle, move it above it in your layers palette. Copy & paste paper of choice, I used pp8. Go to Selections-->invert & hit delete on your keyboard. Add the same noise as before onto the white layer. I deleted Raster 9, the pink dotted line going around the rectangle.
Now do the exact same thing to the purple rectangle layer as you did to the black rectangle layer. Except this one I didn't delete the white dotted line. And I used pp2. Again, add the noise to the white background.
Again repeat this process for Copy of Raster 3. Using paper of choice, I used pp8. On this one, before I copied the paper, I went to Image-->Free Rotate & rotated 60 degrees to the right. You will see why I did this when you paste the paper on & invert it. Add the same noise as above onto the white layer behind.
Ok, one more time we are going to repeat the above steps for Raster 3, the large pink circle. Using paper of choice, I used pp4. Add the noise to the white layer again.
Now add your tubes to your liking. For mine, I used the close up, resized by 75%, on both small squares in front. I added xero-->radiance to them with the following settings...

To start, resize your close up tube by 75% then add your radiance. Mirror it & copy & paste onto the right side square. Duplicate & mirror again. You may have to adjust this just a little bit. Now, doing one side at a time, duplicate again, on duplicated layer, go to Adjust-->Blur-->Gaussian Blur & blur by 4. Go to blend mode & change to screen & change opacity to 70%. On the original one, change blend mode to Luminance(L). Do the same with the other layer. I also added the radiance to the full length tube & pasted it on the very top layer right in the middle & I mirrored her to face the tother way.
Now let's add some elements...
Element 53: the sparkles, I added above one of the lower layers, duplicated & flipped. Then go back & duplicate the top layer of sparkles & mirror & do the same the the bottom layer.
Element 56: Resize 95%, paste onto top gray rectangle layer & place along the top of it, duplicate & flip. You may have to arrange a little bit.
Element 38: I erased some of the top diamonds & pasted onto the side of the gray rectangle, duplicate & flip. May have to rearrange a bit.
Element 59: I duplicated the star 3 times & placed randomly on the tag
Element 35: I resized 75% & pasted onto tag. I arranged on the left hand side, duplicated & mirrored.
Element 32: I added the picture frame from the kit just under the full length tube on the tag. I used pp8 as the background to the frame. Arrange tube as you wish. I added the same radiance as above to the tubes, duplicated, added gaussian blur of 4 to duplicated layers & changed blend mode to soft light. On original layer, change blend mode to luminance.
After I added this I duplicated the large sparkle/star, element 59 & placed around a couple more times.
Last element 28: Resize 50%. Add to tag above one of the lower layers, I placed mine to the left under the butterfly, duplicated & mirrored. Duplicated again & flipped, rearranging it to my liking, then duplicating one last time & mirror.
Now if you are happy with your tag, add your name & copyright info & save as png.
Thank you for trying my tutorial. Come back soon!
♥HUGZ♥JESS♥
7/14/2011
New Tut: Sunrise

THIS TUTORIAL WAS WRITTEN FOR THOSE WITH A GENERAL WORKING KNOWLEDGE OF PSP
SUPPLIES:
PSP-ANY VERSION : I USED PSP X2
TUBE OF CHOICE : I USED THE BEAUTIFUL WORK OF JENNIFER JANESKO YOU MUST HAVE A LICENSE TO USE THIS WORK TO GET THE TUBE & INFO ON OBTAINING A LICENSE, GO...HERE LAST TIME I WAS THERE, THIS TUBE COULD BE FOUND AT THE VERY BOTTOM OF PAGE 8, BUT DON'T HOLD ME TO THAT
SCRAP KIT OF CHOICE : I USED A GORGEOUS KIT CALLED SUNRISE BY RIENEKE DESIGNS, IF YOU HAVE NOT SEEN HER KITS OR BEEN TO HER BLOG, YOU ABSOLUTELY MUST CHECK IT OUT YOU CAN GET TO HER BLOG...HERE TO PURCHASE THIS KIT, YOU CAN DO THAT EITHER. @ SCRAPS WITH ATTITUDE...HERE
OR TWILIGHT SCRAPS...HERE
OR TWILIGHT SCRAPS...HERE
MASK OF CHOICE: I USED A BEAUTIFUL MASK BY BUTTERFLY FLUTTERBY CREATIONS, WHICH YOU CAN GET...HERE I USED MASK #86, WHEN YOU GO TO HER SITE THROUGH MY LINK, IT SHOULD BE THE 3RD POST DOWN CAL;LED NEW MASKS 84-88
EFFECTS: I USED XERO-->RADIANCE
OK, LET'S GET STARTED:
OPEN A NEW RASTER IMAGE, TRANSPARENT, 700 x 700
OPEN ELEMENT 101 COPY & PASTE ONTO IMAGE
OPEN PAPER 3 & RESIZE TO 500 x 500 PIXELS
GO BACK TO YOUR IMAGE, MAKING SURE THE FRAME IS HIGHLIGHTED, USING YOUR MAGIC WAND, CLICK INSIDE IT, GO TO SELECTIONS-->MODIFY-->EXPAND & EXPAND BY 6
GO BACK TO THE PAPER & COPY NOW PASTE THE PAPER ONTO YOUR IMAGE BENEATH THE FRAME
OPEN PAPER 3 & RESIZE TO 500 x 500 PIXELS
GO BACK TO YOUR IMAGE, MAKING SURE THE FRAME IS HIGHLIGHTED, USING YOUR MAGIC WAND, CLICK INSIDE IT, GO TO SELECTIONS-->MODIFY-->EXPAND & EXPAND BY 6
GO BACK TO THE PAPER & COPY NOW PASTE THE PAPER ONTO YOUR IMAGE BENEATH THE FRAME
GO BACK TO SELECTIONS-->INVERT & HIT DELETE ON YOUR KEYBOARD GO TO SELECTIONS-->SELECT NONE
NOW OPEN PAPER 6 & RESIZE IT TO 700 x 700 PIXELS
GO TO YOUR TAG & IN THE LAYERS PALETTE, HIGHLIGHT THE BOTTOM LAYER, IT SHOULD BE BLANK IF YOU DON'T HAVE A BLANK BOTTOM LAYER, GO TO LAYERS-->NEW RASTER LAYER THEN MOVE TO BOTTOM IF NOT ALREADY THERE
NOW THERE ARE 2 WAYS TO ADD A MASK & I WILL EXPLAIN BOTH...
NOW THERE ARE 2 WAYS TO ADD A MASK & I WILL EXPLAIN BOTH...
1ST: IF YOU HAVE A MASKS FOLDER IN YOUR PSP FILES, DOWNLOAD THE MASKS SET & EXTRACT THEM INTO THAT FOLDER IN PSP GO TO LAYERS-->LOAD/SAVE MASK-->LOAD FROM DISK & FIND THE MASK IN YOUR FOLDER
2ND: IF YOU HAVE NO FOLDER, WHEN YOU DOWNLOAD THE MASK, & OPEN IT TO EXTRACT THEM, OPEN THE FOLDER UP & HAVE YOUR PSP OPEN IN THE BACKGROUND, GRAB MASK 86 & SLIDE IT INTO PSP & IT WILL OPEN IN THERE, SHRINK IT IN THE BACKGROUND, REMEMBERING THE NAME OF IT
GO TO YOUR LAYERS PANEL & RIGHT CLICK YOUR MOUSE OVER THE PAPER LAYER & GO TO NEW MASK LAYER-->FROM IMAGE IN THE PULL DOWN MENU FIND THAT MASK LAYER & APPLY IT.
NO MATTER WHICH WAY YOU APPLY THE MASK, WHEN YOU ARE DONE, MAKING SURE THE MASK IS YOUR ACTIVE LAYER IN LAYERS PALETTE, GO TO LAYERS-->MERGE-->MERGE GROUP AFTER THIS I DUPLICATED MY MASK LAYER TO MAKE IT A BIT DARKER, THEN MERGED THE 2 LAYERS TOGETHER
NOW OPEN ELEMENT 94 & RESIZE BY 75% & MIRROR COPY & PASTE ONTO YOUR TAG ABOVE THE FRAME LAYER USING THE PICK TOOL ROTATE IT A BIT TO THE LEFT SO IT CAN LAY IN THE LEFT HAND TOP CORNER OF THE FRAME, SEE MY TAG FOR REFERENCE IF NEEDED I ERASED A FEW OF THE LEAVES & TINY FLOWERS THAT HUNG OUT OVER IT TOO MUCH ONCE SATISFIED WITH PLACEMENT, DUPLICATE, MIRROR & FLIP YOU WILL NOW HAVE ONE IN THE BOTTOM RIGHT HAND CORNER
WHICHEVER FLOWER LAYER IS ON TOP IN YOUR LAYERS PALETTE, HIGHLIGHT IT
GO TO LAYERS-->MERGE-->MERGE DOWN
NOW LET'S ADD THE TUBE
COPY & PASTE THE TUBE ON TOP OF THE FRAME, ADJUST TO YOUR LIKING. WITH MINE, I PLACED HER IN THE CENTER OF THE FRAME, I THEN MADE MY FRAME THE ACTIVE LAYER, USING THE MAGIC WAND CLICKED IN SIDE IT WENT TO SELECTIONS-->MODIFY-->EXPAND & EXPANDED BY 1 GO TO SELECTIONS-->INVERT NOW MAKE YOUR TUBE THE ACTIVE LAYER & GO TO YOUR ERASER & ERASE THE BIT ON THE BOTTOM OF THE FRAME THAT IS STICKING OUT OVER THE EDGE OF THE INSIDE OF THE FRAME. SO IT LOOKS LIKE HER BOTTOM 1/2 IS UNDER THE FRAME BUT HER TOP 1/2 IS NOT
AFTER YOU ARE DONE WITH THAT, MAKE YOUR TUBE ACTIVE & GO TO EFFECTS-->XERO-->RADIANCE & APPLY I LEFT THE SETTINGS AS ARE WHEN OPENED THEN I ADDED A DROP SHADOW TO HER WITH THE SETTINGS 0, 0, 40, 9.00 WITH BLACK AS THE COLOR
OPEN ELEMENT 96 & PASTE ON TOP OF FRAME, I TURNED MINE, AGAIN WITH THE PICK TOOL, JUST A TOUCH TO THE LEFT TO MAKE IT RUN STRAIGHT DOWN THE ONE SIDE OF THE FRAME I ALSO MOVED THIS UNDER THE FLOWER LAYER ONCE SATISFIED, DUPLICATE, GO TO IMAGE-->FLIP THEN IMAGE-->MIRROR
OPEN ELEMENT 89 & FLIP IT COPY & PASTE ON TOP OF ALL LAYERS FOR MINE I PLACED IT IN THE TOP RIGHTISH HAND CORNER, MAKING THE LARGER SPARKLE PLACED IN THE CENTER OF THE SMALLER FLOWER BUT PLACE WERE YOU WISH I THEN DUPLICATED, MIRRORED & FLIPPED I PUT THE BOTTOM SPARKLES ABOVE THE TUBE, LEAVING THE TOP ONE UNDER IT
OPEN ELEMENT 82 COPY & PASTE ONTO THE PAPER BELOW THE FRAME I LEFT IT JUST AS IT WAS IT SHOULD BE UNDER THE FRAME LAYER BUT ABOVE THE PAPER ONE , I ALSO DECIDED, AFTER MUCH CONTEMPLATION...LOL TO ADD ELEMENT 73 AS WELL,, UNDER THE ELEMENT YOU JUST ADDED
IT GAVE IT A BIT BRIGHTER LOOK UNDER THE SPARKLES, BUT THIS IS OPTIONAL, SOME MAY THINK IT TOO BRIGHT FOR BOTH
OPEN ELEMENT 46 COPY & PASTE ON TO FRAME I PLACED IT IN THE BOTTOM LEFT HAND CORNER ON TOP OF THE OTHER ELEMENTS BUT UNDER THE TUBE I THEN DUPLICATED, MIRRORED & FLIPPED THEN MERGED DOWN TO MAKE THEM 1 LAYER
NOW OPEN ELEMENT 38 & RESIZE 25% I PASTED MINE ON TOP OF THE FLOWERS IN THE TOP LEFT HAND CORNER I KNOW IT COVERS MOST OF THE FLOWERS, BUT I THOUGHT IT \LOOKED REALLY NICE WITH PARTS OF THE FLOWERS BENEATH IT STICKING OUT A BIT I THEN DUPLICATED & MIRRORED IT THEN MOVED IT DOWN TO THE BOTTOM RIGHT HAND CORNER I ALSO ADDED A SMALL XERO-->GRADIENT GLOW EFFECT AROUND EACH OF THE FLOWERS SO THEY STUCK OUT A BIT & DIDN'T GET LOST WITH THE OTHER ELEMENTS ALL AROUND IT. I KNOW IT MIGHT LOOK A LITTLE BUSY, BUT I THOUGHT THAT EACH ELEMENT COMPLIMENTED TO OTHERS, SO ONLY ADD WHAT YOU LIKE
OPEN ELEMENT 14 COPY & PASTE ON TOP OF THE PAPER BACKGROUND LAYER BENEATH YOUR FRAME. I PASTED MINE JUST UNDER THE FRAME LAYER BUT ABOVE THE SPARKLES & SUN LAYERS ALREADY THERE. THEN I USED MY PICK TOOL TO MAKE IT SMALLER SO YOU COULD SEE IT BETTER
OPEN ELEMENT 15 & PASTE ABOVE THE FRAME LAYER I PLACED MINE TOWARDS THE TOP LEFT HAND CORNER, DUPLICATED, MIRRORED & FLIPPED
I USED ELEMENT 32, RESIZED BY 25% & PLACED A COUPLE BEHIND EACH FLOWER AT THE 2 CORNERS
NOW IF YOU ARE SATISFIED WITH YOUR TAG, ALL YOU NEED TO DO IS ADD YOUR COPYRIGHT INFO & YOUR NAME THEN SAVE AS A PNG
THANK YOU SO VERY MUCH FOR TRYING MY TUT. AGAIN, THIS ONE WAS STILL TOO LONG & I ABSOLUTELY HATE MAKING THEM SO,. I JUST HAVEN'T FIGURED OUT HOW TO CUT THEM BACK YET...LOL!
♥MUAH♥
♥HUGZ♥JESS♥
♥HUGZ♥JESS♥
7/11/2011
Behind Blue Eyes

THIS TUTORIAL WAS WRITTEN FOR THOSE WITH A GENERAL WORKING KNOWLEDGE OF PSP
SUPPLIES:
PSP-ANY VERSION : I USED PSP X2
TUBE OF CHOICE : I USED THE BEAUTIFUL ARTWORK OF ZINDY S.D. NIELSEN YOU MUST HAVE A LICENSE TO USE HER WORK YOU CAN GET BOTH THE TUBE & INFO TO OBTAIN A LICENSE...HERE
SCRAP KIT OF CHOICE : I AM USING A GORGEOUS KIT CALLED "BEHIND BLUE EYES" MADE BY VICKI OF PINK PRINCESS SCRAPS YOU CAN GET TO HER BLOG...HERE YOU CAN PURCHASE THIS KIT AT HER STORE, PINKPRINCESS-SCRAPS, TO GET THERE GO...HERE
EFFECTS: I USED XERO-RADIANCE PLUG-IN, NOW YOU CAN GO...HERE TO DOWNLOAD JUST THE RADIANCE PLUG-IN OR FOR THE FULL XERO PACK, GO...HERE & LOOK UNDER
FREEWARE PLUG-INS & THE XERO: FREEWARE FILTERS
FREEWARE PLUG-INS & THE XERO: FREEWARE FILTERS
OK, LET'S GET STARTED:
GO TO FILE-->NEW & OPEN RASTER BACKGROUND, TRANSPARENT, 700 x 700
OPEN ELE44, RESIZE 80% COPY & PASTE ONTO IMAGE
WITH YOUR MAGIC WAND & HOLDING DOWN THE SHIFT BUTTON ON YOUR KEYBOARD, CLICK INSIDE BOTH SIDES OF THE FRAME YOU SHOULD HAVE MARCHING ANTS AROUND EACH SIDE WHEN YOU ARE DONE
OPEN PP2 & COPY IN THE LAYERS PALETTE HIGHLIGHT THE LAYER BELOW YOUR FRAME LAYER. IF THERE IS NOT ONE THERE, GO TO LAYERS-->NEW RASTER LAYER. IF IT IS NOT UNDER THE FRAME, MOVE IT NOW PASTE THE PAPER ON TO THAT LAYER GO TO SELECTIONS-->INVERT & DELETE ON YOUR KEYBOARD GO TO SELECTIONS-->SELECT NONE
OPEN YOUR TUBE OF CHOICE THE TUBE I USED CAME WITH 2 SELECTIONS, ONE WITH A MOON & ONE WITHOUT. I USED THE ONE WITHOUT & USING MY PICK TOOL I MADE HER BIGGER THAN THE ORIGINAL SIZE, WHICH DOES TEND TO GET BLURRY JUST TO LET YOU KNOW., WHICH IS WHY I WENT TO ADJUST-->SHARPNESS-->SHARPEN WHEN YOU HAVE IT HOW YOU WANT IT, MAKE SURE THE FRAME IS HIGHLIGHTED IN LAYERS PALETTE AGAIN GET OUT YOUR MAGIC WAND & CLICK INSIDE JUST THE LEFT FRAME THIS TIME GO TO SELECTIONS-->MODIFY-->EXPAND & EXPAND BY 4 GO BACK TO LAYERS PAPER & HIGHLIGHT THE TUBE NOW GO TO SELECTIONS-->INVERT & HIT DELETE ON YOUR KEYBOARD GO TO SELECTIONS-->SELECT NONE I THEN CHANGED THE BLEND MODE ON MINE TO LUMINANCE
OPEN ELE18 & RESIZE 35% COPY & PASTE ON TOP OF FRAME WITH THIS WE ARE GOING TO PLACE IT ALL AROUND THE OUTSIDE OF THE FRAME AS WELL AS THE IN THE MIDDLE DOWN THE 2 PIECES. PLACE THE 1ST TO YOUR LIKING THEN DUPLICATE & MIRROR & MOVE AROUND UNTIL THE ENTIRE FRAME IS COVERED FOR A COUPLE OF THEM YOU WILL HAVE TO ROTATE THE, TO DO THIS GO TO IMAGE-->FREE ROTATE & SET YOUR SETTINGS & CLICK OK NOW IF YOU WANT, THIS MAY BE EASIER, HIGHLIGHT THE TOP MOST LEAVES LAYER IN YOUR LAYERS PALETTE, GO TO SELECTIONS-->MERGE-->MERGE DOWN REPEAT THIS UNTIL YOUR LEAVES ARE ALL ONE LAYER
THIS JUST SEEMS EASIER THAN HAVING A BUNCH OF LAYERS OF LEAVES
THIS JUST SEEMS EASIER THAN HAVING A BUNCH OF LAYERS OF LEAVES
OPEN ELE33 & RESIZE 28% COPY & PASTE ON TOP OF YOUR LEAVES LAYER & PLACE IN THE BOTTOM LEFT HAND CORNER
OPEN ELE54 & RESIZE 20% COPY & PASTE ON TOP OF LEAVES IN THE BOTTOM RIGHT HAND CORNER GO TO SELECTIONS-->FREE ROTATE--ROTATE RIGHT 20 DEGREES
OPEN ELE55 & RESIZE 40% COPY & PASTE ON TOP OF MUSIC PAPER & ARRANGE IT RIGHT ON TOP OF THAT
OPEN ELE53 & RESIZE 40% COPY & PASTE ONTO TAG PLACE AT YOUR DISCRETION I JUST PASTED MINE IN A COUPLE DIFFERENT SPOTS AROUND THE TAG
OPEN ELE 57 & 58 & RESIZE 15% COPY & PASTE ARRANGE TO YOUR LIKING
GO BACK TO YOUR OPEN TUBE & IF THERE IS MORE THAN 1 SIZE, DECIDE WHAT YOU WANT GO TO EFFECTS-->PLUG-INS-->XERO-->RADIANCE & ADD THE FOLLOWING SETTINGS...

I DID NOT USE A MASK ON MINE, BUT YOU OBVIOUSLY CAN ADD WHATEVER YOU LIKE, OTHER ELEMENTS, TUBES...ETC. MAKE IT PERSONAL & MAKE IT YOUR OWN IF YOU DON'T WANT TO FOLLOW THE TUT EXACTLY.
OK, THAT IS IT EVERYONE. THANK YOU SO MUCH FOR TRYING MY TUTORIAL & I WILL BE TALKING WITH YOU ALL AGAIUN REAL SOON!
♥MUAH♥
♥HUGZ♥JESS♥
♥HUGZ♥JESS♥
7/07/2011
♥MY 1st AWARD♥

YAY!! I got my very 1st blog award. I am receiving it a bit late because I had not noticed it, my fault completely for not checking my shout box. I received it from Vicki of Pink Princess Scraps, whom is absolutely AWESOME!! She RAWKS!! THANK YOU THANK YOU THANK YOU Vicki, for not only the award, but for everything. For being here & allowing me to be a part of you creative team, even through my ups & downs. This goes to the other creative teams I belong to as well.
There are no rules to this award
only that you send it to 5 people that you think deserve this award.
Make sure you leave them a message.
The 5 blogs I picked are listed below.....
Make sure you leave them a message.
The 5 blogs I picked are listed below.....
1. Xoiya Creations
2. Pink Princess Scraps
3. Addictive Pleasures
4. Rieneke Designs
5. Divine Intentionz
Thanks again & have a wonderful day!
♥HUGZ♥JESS♥
5/25/2011
♥New Tut: Pretty As A Picture♥
HELLO BLOGGERS & BLOGETTES! I HAVE A NEW TUT UP...

THIS TUTORIAL WAS MADE FOR THOSE WITH A GENERAL WORKING KNOWLEDGE OF PSP
SUPPLIES:
PSP-ANY VERSION: I USED PSP X2
TUBE OF CHOICE: I AM USING THE GORGEOUS ARTWORK OF JOSE CANO YOU MUST HAVE A LICENSE TO USE HIS WORK TO GET BOTH THE TUBE & INFO ON OBTAINING A LICENSE, GO...HERE
SCRAPKIT OF CHOICE: I AM USING A BEAUTIFUL KIT CALLED PAAP-PRETTY AS A PICTURE, BY VICKI OF PINK PRINCESS SCRAPS YOU CAN FIND HER BLOG...HERE & TO PURCHASE THE KIT, GO...HERE
OK, LET'S GET STARTED:
OPEN A NEW RASTER IMAGE, TRANSPARENT, 700 x 700
OPEN ELE25 COPY & PASTE ONTO TAG USING YOUR PICK TOOL RESIZE TO YOUR LIKING
OPEN PP1 & RESIZE IT TO 700 x 700 PIXELS & COPY
ON YOUR TAG MAKE SURE YOUR FRAME IS HIGHLIGHTED IN LAYERS PALETTE USING YOUR MAGIC WAND, WITH YOUR FINGER HOLDING DOWN THE SHIFT BUTTON, CLICK INSIDE EACH OF THE TRIANGLES INSIDE THE FRAME CHANGE BACK TO THE HAND, WHICH IS CALLED THE PAN TOOL,
GO TO SELECTIONS-->MODIFY-->EXPAND & EXPAND BY 6 GO BACK TO YOUR LAYERS PALETTE & CLICK THE EMPTY LAYER BENEATH THE FRAME, IF THERE ISN'T ONE, GO TO LAYERS-->NEW RASTER LAYER, COW PASTE THE PAPER ONTO THAT LAYER GO TO SELECTIONS-->INVERT & PRESS DELETE ON YOUR KEYBOARD SELECTIONS-->SELECT NONE
THE TUBE I USED HAS 3 SIZES,, OPEN THE SMALLEST TUBE, COPY & PASTE ON TOP OF PAPER LAYER BUT BENEATH FRAME LAYER POSITION THE TUBE ON THE LEFT SIDE OF THE FRAME IN THE WINDOW. SEE MY TAG FOR PLACEMENT IF NEEDED
GO BACK TO LAYERS PALETTE & HIGHLIGHT THE FRAME AGAIN GET YOUR MAGIC WAND OUT & CLICK INSIDE THE 2 FRAMES, THE TOP & BOTTOM, ON THE LEFT HAND SIDE GO TO
SELECTIONS-->MODIFY-->EXPAND & EXPAND BY 2 GO BACK TO LAYER PALETTE & HIGHLIGHT YOUR TUBE LAYER GO TO SELECTIONS-->INVERT & AGAIN HIT DELETE ON YOUR KEYBOARD GO TO SELECTIONS-->SELECT NONE
SELECTIONS-->MODIFY-->EXPAND & EXPAND BY 2 GO BACK TO LAYER PALETTE & HIGHLIGHT YOUR TUBE LAYER GO TO SELECTIONS-->INVERT & AGAIN HIT DELETE ON YOUR KEYBOARD GO TO SELECTIONS-->SELECT NONE
I THEN ADDED THE EFFECT XERO: RADIANCE WITH THE FOLLOWING SETTINGS...

THEN I DUPLICATED THE TUBE & MIRRORED SO SHE WAS ON THE RIGHT SIDE UNDER THE WINDOW FRAME AS WELL. YOU MAY HAVE TO ADJUST HER A BIT DEPENDING ON HOW CENTERED YOUR WINDOW IS
OPEN ELE42 & RESIZE 45% COPY & PASTE ON TOP OF FRAME & POSITION IN THE BOTTOM LEFT CORNER OF THE FRAME DUPLICATE & MIRROR DUPLICATE AGAIN & FLIP DUPLICATE ONE MORE TIME & MIRROR GO TO LAYERS-->MERGE-->DOWN UNTIL ALL 4 LEAVES ARE 1 LAYER INSTEAD OF 4
NOW TAKE YOUR MIDDLE SIZED TUBE, IF YOU ARE USING ONE WITH DIFFERENT LAYERS, COPY & PASTE ON TOP LAYER & POSITION SO SHE IS IN THE CENTER ABOVE ALL LAYERS, MAKE SURE THE BOTTOM OF THE TUBE LINES UP WITH THE INSIDE OF THE BOTTOM OF THE FRAME
OPEN ELE45 & RESIZE 60% COPY &PASTE ON TOP OF THE GREEN LEAVES BUT UNDER THE MIDDLE TUBE ON THE TOP RIGHT HAND CORNER DUPLICATE & MIRROR MERGE DOWN TO MAKE 1 LAYER DUPLICATE THIS & FLIP AGAIN, YOU MY HAVE TO REARRANGE JUST A BIT & YOU WANT TO MOVE THIS LAYER ABOVE THE MIDDLE TUBE
OPEN ELE47 & RESIZE 80% COPY & PASTE ONTO TAG ON TOP LAYER ARRANGE TO YOUR LIKING, DUPLICATE AS MANY TIMES AS YOU WISH & ARRANGE AROUND TAG I DUPLICATED TWICE AND PUT 1 ON EACH SIDE AT DIFFERENT POINTS
OPEN ELE21 & RESIZE 20% COPY & PASTE ONTO TAG ON TOP LAYER I PLACED ONE IN TOP RIGHT HAND CORNER & ANOTHER IN THE BOTTOM LEFT HAND CORNER
OPEN ELE23 & RESIZE 30% COPY & PASTE ABOVE THE FRAME LAYER POSITION ONE IN THE CENTER OF THE FRAME ON THE RIGHT HAND SIDE DUPLICATE & MIRROR
OPEN ELE9 & RESIZE 30% COPY & PASTE ON TOP LAYER IN THE CENTER AT THE BOTTOM OF THE FRAME ON TOP OF THE RIBBONS
OPEN ELE17 & RESIZE 40% COPY & PASTE ON TOP LAYER & PLACE AT THE BOTTOM OF THE FRAME ON THE LEFT SIDE OF THE CLOCK DUPLICATE & MIRROR
OPEN ELE14 COPY & PASTE ON TOP OF FRAME LAYER & POSITION RUNNING ALONG THE INSIDE EDGES OF THE 2 SMALLER RECTANGLE FRAMES ON THE LEFT SIDE, SEE MY TAG FOR REFERENCE IF NEEDED, I RESIZED THIS WITH MY PICK TOOL WHEN SATISFIED WITH SIZE & PLACEMENT DUPLICATE & MIRROR
OK, THIS PART IS TRICKY IF YOU HAVE NEVER DONE IT BEFORE I WILL EXPLAIN AS BEST I CAN
HIGHLIGHT THE VERY TOP LAYER IN YOUR LAYERS PALETTE GO TO LAYERS NEW RASTER LAYER
IN YOUR MATERIALS PALETTE MAKE THE BACKGROUND COLOR WHITE & FOREGROUND COLOR TRANSPARENT GO TO YOUR RECTANGLE TOOL & DRAW OUT A RECTANGLE STARTING FROM THE INSIDE LEFT OF YOUR FRAME RUNNING TO THE INSIDE RIGHT SIDE OF YOUR FRAME
CHANGE THE OPACITY TO 60% GO TO YOUR NEW LAYER YOU JUST MADE IN THE LAYER PALETTE & RIGHT CLICK & GO TO CONVERT TO RASTER LAYER NOW YOU ARE GOING TO MOVE THIS LAYER SO IT IS JUST ABOVE YOUR MIDDLE TUBE LAYER
AFTER I DID THIS I TOOK THE COLOR #df9fc & I WROTE OUT WITH THE FONT CALLIGRAPHY SIZE 20 PRETTY AS A PICTURE OVER & OVER, SEE MY TAG FOR REFERENCE
NOW ADD ANOTHER RASTER LAYER & GET OUT YOUR PEN TOOL WITH THE BACKGROUND COLOR TRANSPARENT & THE FOREGROUND COLOR #df9f9c CHANGE THE LINE STYLE TO DIAMOND & WIDTH 3 MAKE SURE THE MODE IS ON DRAW LINES & POLYLINES & WHEN WE START TO DRAW LINE HOLD DOWN ON THE SHIFT BUTTON & IT WILL STAY STRAIGHT
SO WE ARE GOING TO DRAW THE 1ST LINE JUST ABOVE THE WHITE RECTANGLE, IT WILL BE TOUCHING THE TOP OF IT, NOW REMEMBER, HOLD DOWN ON THE SHIFT BUTTON THEN START TO DRAW IT OUT LET OFF IT WHEN YOU ARE DONE GO FROM THE INSIDE OF THE LEFT TO THE INSIDE OF THE RIGHT JUST WE DID WITH THE WHITE RECTANGLE NOW DUPLICATE THE LINE YOU JUST MADE & GRAB IT WITH YOUR MOVE TOOL & MOVE JUST BELOW THE WHITE RECTANGLE
NOW COVERT TO RASTER
NOW REPEAT THE SAME STEPS AS ABOVE EXCEPT THIS TIME MAKE THE LINE WHITE & IT WILL BE ABOVE THE OTHER LINE JUST A BIT. DUPLICATE AS BEFORE & MOVE DOWN BELOW THE OTHER I ADDED THE NAME ON TOP OF THE WHITE RECTANGLE YOU CAN DO THIS HOWEVER YOU LIKE
IF YOU WANT TO ADD ANYTHING ELSE TO YOUR TAG GO AHEAD & DO THAT NOW IF YOU ARE HAPPY WITH IT, ADD YOUR COPYRIGHT INFO MERGE IF YOU WANT
THANK YOU SO MUCH FOR TRYING MY TUTORIAL
♥MUAH♥
♥HUGZ♥JESS♥
♥HUGZ♥JESS♥
5/05/2011
♥NEW TUT: ROCK PRINCESS♥
HELLO TO ALL AGAIN! I HAVE A NEW TUT UP. I AM POSTING THE TUT HERE, AS WELL AS ON MY GOOGLE SITE. SO YOU CAN GET IT EITHER PLACE. MY GOOGLE SITE, CREATIVE DESIGNZ TUTZ LINK FOR THE ROCK PRINCESS TUT IS HERE

THIS TUTORIAL WAS WRITTEN FOR THOSE WITH A GENERAL WORKING KNOWLEDGE OF PSP
SUPPLIES:
PSP-ANY VERSION : I USED PSP X2
TUBE OF CHOICE : I USED THE BEAUTIFUL WORK OF ARTHUR CROW YOU MUST HAVE A LICENSE TO USE HIS WORK TO GER THE TUBE & INFO ON OBTAINING A LICENSE, GO...HERE
SCRAP KIT OF CHOICE : I USED THE VERY AWESOME WORK OF TAMIE OF ADDICTIVE PLEASURES, A KIT CALLED ROCK PRINCESS 2011 YOU CAN FIND HER BLOG...HERE & YOU CAN PURCHASE THE KIT AT HER STORE, DREAMS-N-DIGITAL...HERE
TEMPLATE : I MADE THE TEMPLATE FOR THIS TUTORIAL MYSELF. YOU CAN FIND IT ON MY OTHER BLOG...HERE, BUT FOR THIS TUT, YOU CAN DOWNLOAD IT...HERE
EFFECTS : I USED THE EFFECT XERO-->RADIANCE
OK, LET'S GET STARTED
OPEN UP THE TEMPLATE HIT SHIFT D ON YOUR KEYBOARD CLOSE THE ORIGINAL TEMPLATE
DELETE THE COPYRIGHT INFO ON THE TEMP
DELETE THE COPYRIGHT INFO ON THE TEMP
GO TO IMAGES-->CANVAS SIZE & CHANGE IT TO 750 X 525 THAT IS WHAT I PUT MINE TOO, IF YOU RATHER HAVE IT A BIT SMALLER YOU CAN, BUT YOU MAY HAVE TO RESIZE THE ITEMS DIFFERENTLY THAN I DID
WE WILL START WITH ADDING PAPER TO THE LAYERS
OPEN P6 & COPY
GO BACK TO THE TEMPLATE HIGHLIGHT THE BOTTOM PINK RECTANGLE GO TO SELECT-->SELECT ALL, SELECT-->FLOAT SELECT-->DEFLOAT PASTE THE PAPER ON GO TO SELECT-->INVERT & HIT DELETE ON YOUR KEYBOARD GO TO SELECT-->SELECT NONE
USING THE SAME INSTRUCTIONS AS ABOVE, ADD THE REST OF THE PAPER TO THE FOLLOWING LAYERS...
P8 TO THE WHITE RECTANGLE
P11 ON THE 2 SMALL BLUISH PURPLE RECTANGLES
P3 ON THE SMALL PINK RECTANGLE
OK, NOW WE ARE GOING TO ADD PAPER TO THE PRINCESS WORDART, BUT WE ARE GOING TO ADD 2 DIFFERENT PAPERS SO,
MAKE SURE THE PRINCESS WORDART IS HIGHLIGHTED IN THE LAYERS PALETTE, GET YOUR MAGIC WAND & HOLDING DOWN THE SHIFT BUTTON CONTINUOUSLY, CLICK INSIDE THE P, I, C & 1ST S ON THE TOP & BOTTOM WITH THE MAGIC WAND NOW LET GO OF THE SHIFT BUTTON
OPEN P10 COPY & PASTE ONTO TAG GO TO SELECT-->INVERT & HIT DELETE ON YOUR KEYBOARD THEN SELECT-->SELECT NONE
OPEN P10 COPY & PASTE ONTO TAG GO TO SELECT-->INVERT & HIT DELETE ON YOUR KEYBOARD THEN SELECT-->SELECT NONE
NOW REPEAT THAT AGAIN EXCEPT THIS TIME WITH R, N, E & LAST S
COPY & PASTE P1 ONTO THE TAG GO TO SELECT-->INVERT & HIT DELETE ON YOUR KEYBOARD
GO TO SELECT-->SELECT NONE
COPY & PASTE P1 ONTO THE TAG GO TO SELECT-->INVERT & HIT DELETE ON YOUR KEYBOARD
GO TO SELECT-->SELECT NONE
NOW GO TO THE TOP LAYER OF THE PAPER PRINCESS WORDART & MERGE DOWN TO MAKE THE PINK & YELLOW PAPER WORDART 1 LAYER
NOW WE ARE GOING TO ADD THE TUBES INTO THE PRINCESS WORDART THIS PART IS GOING TO BE TRICKY, BUT ONCE WE ARE DONE YOU WILL UNDERSTAND WHY WE DID IT THE WAY WE DID.
HIDE THE YELLOW & PINK PAPER PRINCESS WORDART LAYER, BUT KEEP THE BLACK ONE UNHID, WE NEED TO USE THAT ONE FOR THE TUBES.
WE ARE GOING TO DO THESE 1 LETTER AT A TIME. I WILL TELL YOU HOW TO DO IT WITH 1 LETTER, THEN YOU WILL REPEAT EACH LETTER THE SAME EXACT WAY UNTIL THEY ARE ALL DONE.
OK, MAKE SURE YOUR PRINCESS WORDART, THE BLACK LAYER, IS HIGHLIGHTED IN THE LAYERS PALETTE GET YOUR MAGIC WAND & HOLDING THE SHIFT BUTTON DOWN, CLICK INSIDE THE LETTER P, BOTH ON TOP & BOTTOM SO THE FULL LETTER HAS THE MARCHING ANTS AROUND IT
GO TO YOUR TUBE & COPY THE LAYER YOU WANT TO USE, LIKE MINE HAD 3 VERSION, A FULL LENGTH, A PARTIAL LENGTH & CLOSE UP TUBE. I USED THE MIDDLE ONE
COPY IT & PASTE IT ONTO TAG, GET YOUR MOVE TOOL, IT LOOKS KIND OF LIKE A CROSS,
MOVE THE TUBE OVER THE LETTER P, YOU WILL STILL BE ABLE TO SEE THE MARCHING ANTS THROUGH IT, ARRANGE IT TO HOW YOU WANT IT WHEN SATISFIED GO TO SELECT-->INVERT & HIT DELETE ON YOUR KEYBOARD GO TO SELECT-->NONE
COPY IT & PASTE IT ONTO TAG, GET YOUR MOVE TOOL, IT LOOKS KIND OF LIKE A CROSS,
MOVE THE TUBE OVER THE LETTER P, YOU WILL STILL BE ABLE TO SEE THE MARCHING ANTS THROUGH IT, ARRANGE IT TO HOW YOU WANT IT WHEN SATISFIED GO TO SELECT-->INVERT & HIT DELETE ON YOUR KEYBOARD GO TO SELECT-->NONE
NOW DO THE SAME WITH THE REST OF THE LETTERS WHEN YOU ARE DONE, GO TO THE TOP LETTER IN YOUR LAYERS PALETTE, GO TO LAYERS-->MERGE-->MERGE DOWN UNTIL ALL THE TUBES ARE 1 LAYER THEN MOVE THIS LAYER ABOVE YOUR PAPER PRINCESS WORDART LAYER & UNHIDE THE PAPER LAYER SO YOU SHOULD HAVE THE TUBES PRINCESS LAYER ON TOP, THEN THE PAPER PRINCESS LAYER UNDER THAT, THEN THE BLACK PRINCESS WORDART UNDER THAT.
HOPEFULLY THAT MAKES SENSE...LOL
NOW WITH THAT ALL IN ORDER TAKE YOUR TUBES LAYER &
GO TO EFFECTS-->PLUGINS-->XERO-->RADIANCE & APPLY THE FOLLOWING SETTINGS...
GO TO EFFECTS-->PLUGINS-->XERO-->RADIANCE & APPLY THE FOLLOWING SETTINGS...

NOW DUPLICATE YOUR TUBES LAYER ON DUPLICATED LAYER GO TO ADJUST-->BLUR-->GAUSSIAN BLUR WITH A RADIUS OF 3.OO CHANGE THE BLEND MODE TO SOFT LIGHT ON THE ORIGINAL TUBES LAYER, CHANGE THE BLEND MODE TO LUMINANCE (LEGACY)
NOW COPY & PASTE YOUR FULL LENGTH TUBE ONTO THE TOP LAYER, I HAD TO RESIZE MINE BY 98% & THEN ADDED THE SAME RADIANCE SETTINGS AS ABOVE
ONE MORE QUICK ADDITION, I WENT TO THE PAPER LAYER OF THE TOP SMALL BLUISH RECTANGLE & ADDED THE MEDIUM SIZE TUBE & ARRANGED IT SO THE EYES WERE SHOWING ON THE LEFT SIDE END & INVERTED & DELETED. THEN DUPLICATED & MIRRORED DUPLICATED AGAIN & MOVED DOWN TO THE BOTTOM RECTANGLE, ARRANGED ON THE RIGHT SIDE END & DUPLICATED & MIRRORED. MERGE THE LAYERS SO THEY ARE ALL ONE. AND CHANGE BLEND MODE TO LUMINANCE (LEGACY).
NOW LET'S JUST ADD SOME ELEMENTS...
MUSIC NOTES-COPY & PASTE ON TOP OF BLUE PAPER LAYER ON THE RIGHT SIDE, DUPLICATE-MIRROR & FLIP
GLITTER GARLAND-RESIZE 85%-MIRROR COPY & PASTE ON TOP OF PRINCESS WORDART ON THE TOP HALF OF THE WORD DUPLICATE-FLIP & MIRROR
CHAIN- MIRROR COPY & PASTE ON TOP OF GLITTER GARLAND ON THE BOTTOM DUPLICATE-MIRROR & FLIP
CD- RESIZE 20% COPY & PASTE ON TOP OF BOTTOM PINK PAPER RECTANGLE & PLACE IN TOP LEFT CORNER DUPLICATE-MIRROR, DUPLICATE-FLIP, THEN DUPLICATE & MIRROR
NOW THERE IS ONE IN EACH CORNER. YOU CAN MERGE THE LAYERS TOGETHER IF YOU WANT
GUITAR 2- RESIZE 60% COPY & PASTE ON TOP LAYER & PLACE ON RIGHT SIDE EDGE OF TAG IN MIDDLE DUPLICATE & MIRROR
LABELS- RESIZE 50% COPY & PASTE ON TOP LAYER & MOVE DOWN TO LEFT HAND BOTTOM CORNER. SEE MY TAG FOR PLACEMENT IF NEEDED
LIPS-RESIZE 10% COPY & PASTE ON TOO LAYER I PLACED MY LIPS ON GUITAR ON LEFT SIDE, THEN DUPLICATE & MIRROR
LAST ELEMENT--RIBBON EYELETS- RESIZE 50% COPY & PASTE ON TOP OF GREEN PAPER LAYER & PLACE IN LEFT HAND SIDE ALONG THE EDGE DUPLICATE & MIRROR
IF YOU ARE SATISFIED WITH YOUR TAG, ADD YOUR NAME & COPYRIGHT INFO & SAVE AS PNG
THANK YOU SO MUCH FOR TRYING MY TUTORIAL. I AM SORRY THIS ONE IS A BIT LONG. I HAVE BEEN GETTING BETTER ON TRYING TO SHORTEN THEM, BUT THERE WAS A FEW2 DIFFERENT THINGS TO DO IN THIS ONE SO IT CAME OUT LONGER THAN I'D HAVE LIKED. BUT THANKS YOU ALL ANYWAYS * HOPE YOU HAVE ENJOYED TRYING MY TUT!
♥MUAH♥
♥HUGZ♥JESS♥
♥HUGZ♥JESS♥
Subscribe to:
Posts (Atom)
My Blinkie


